upabx is a tool for performing ABX listening tests using one or several UPnP renderers, and, possibly, a hardware switchbox.
The program controls:
-
What is played (maybe different for A/B if comparing e.g. compression methods). This is set as UPnP URL, offset, duration.
-
The device it is played on (for comparing streamers): UPnP Renderer name or uuid.
-
The line-level switch setting (for comparing preamps or sources, etc.).
-
The speaker-level switch setting. Speaker refers to the power level, we normally use it to switch amps actually (still, could switch speakers, too).
These are defined in two sets in parameters, which define the test. The definition file also supports text describing what is connected to what and what it is we try to test.
A companion program provides an easy GUI for creating test definition files, including retrieving the URL from any renderer on which it is playing or paused.
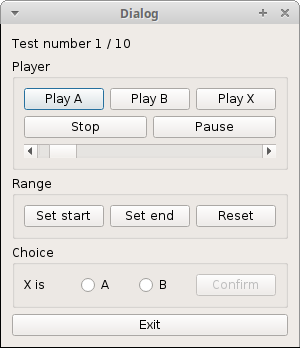
The ABX test Graphical User Interface

This should be largely self-explanatory. The program should be given a test definition file as parameter on the command line:
/path/to/upabx/bin/upabx /path/to/test_definition_fileYou can use the Player section to play samples A, B and X as you like.
The Range section allows you to restrict the part which is played (start and end). Just click the buttons while one of the samples is playing.
Once you’re tired of comparing, use the Choice section to tell the application if you think that the X sample is the same as A or B. Then click Confirm, which will store your choice, and increment the test number.
Repeat until the end of the test sequence.
The A and B samples can be the same URL playing on different renderers (needs switch or mixer), or different URLs (for comparing encodings or performances), or the same renderer and URL if you are using a hardware switch to compare preamplifiers or amplifiers. More on the sample parameters further down.
The upabxmktest test creation utility

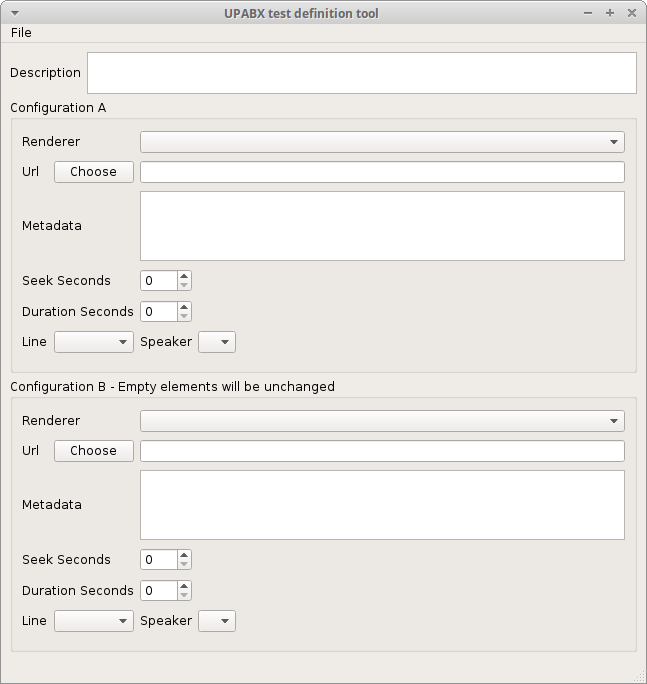
The utility makes it easy to create test files. Especially, it will find out the list of renderers present on the network, and it will retrieve an URL and the associated metadata from a Renderer, so you can set the track to play for each of the A/B sections just by setting it to play (or pause) somewhere, and fetching it from the GUI.
Set the parameters to use in the A section, then set the changed parameters in the B section.
The URL Choose buttons will open a popup, where you will be able to select a renderer from a list. The utility will then fetch the URL and metadata for the track currently playing or paused on the Renderer.
When you are done, use the File menu to save the test definition. The file format details are described in an annex.
Test results
The test results are stored in ~/.local/share/upabx and are named like
date-time-result. They look like the following:
[ Contents of the test parameters file included here]


Mon Nov 13 17:45:37 2017 Choice: B : True
Mon Nov 13 17:45:59 2017 Choice: A : True
Mon Nov 13 17:46:16 2017 Choice: A : True
Mon Nov 13 17:46:36 2017 Choice: B : True
Mon Nov 13 17:46:55 2017 Choice: A : True
Mon Nov 13 17:47:11 2017 Choice: B : True
Mon Nov 13 17:47:26 2017 Choice: A : True
Mon Nov 13 17:47:42 2017 Choice: A : True
Mon Nov 13 17:47:52 2017 Choice: A : True
Mon Nov 13 17:48:00 2017 Choice: B : True

Mon Nov 13 17:48:00 2017 Test completed: 10/10
The global configuration
Most of the program parameters are found in the test parameter files (see next). However, some values are defined in a global configuration file (~/.config/upabx/upabx.conf). The file contains name = value lines.
- switchhost
-
Host name or IP address for the switch interface.
- seqlen
-
Default test sequence length (which itself has a default: 10). This can be redefined in the test configuration for individual tests.
- switchport
-
TCP port for the switch interface (default: 8080).
Only switchhost needs to be defined and only if you are actually using a
hardware switch.
Building, operating environment
The program only runs on Linux/X11 at the moment. It should not be hard to port it to Windows (or Mac OS X). As far as I can see it should mostly be a matter of adjusting the configuration file locations. libupnpp is already ported to both systems, and its Python bindings should not be a major issue. Please contact me if there is an interest: jf@dockes.org
All the code lives here. The GUI code is in the abx directory, the test creation code is in abxmktest.
The Makefile will bundle the Python code into two self-contained Python zipped scripts inside the bin directory: bin/upabx and bin/upabxmktest. Just run make:
cd /path/to/upabx
make
You need to have libupnpp and libupnpp-bindings installed, and you can then start upabx or upabxmktest like any Linux command: copy them somewhere in your PATH, or specify their absolute path, e.g.:
/path/to/upabx/bin/upabxmktest
/path/to/upabx/bin/upabx /path/to/test_definition_file
You will need a hardware switch (or at least a mixer) if you want to compare electronics (from streamers/DACs to power amps). upabx interfaces with a small local web application, typically running on a Raspberry Pi, for controlling the switch (the GUI does not need to run on the same host as the switch controller). Any kind of relay which can interface more or less directly with Raspberry Pi GPIO pins should be workable.
The hardware switch interface application
The switch interface application is a trivial WEB interface based on the Python Bottle framework, and on the Raspberry PI GPIO Python interface (I only tried it on a Raspberry PI, I guess that it should be easy to port to another GPIO-equipped computer if an appropriate Python module is available).
The application should be able to control any relay which can interface with the Pi On/Off GPIO lines (details on my crappy hardware implementation follow further down).
I was too lazy to package the code, which does not really need an
installation (can run from anywhere). It is found under the hwctl
directory in the upabx source tree.
The switch application configuration
The configuration file is expected to be found in /etc/audioswitch.conf. It defines the GPIO pin numbers used to control the line and speaker relays. The contents are as follows:
# GPIO pin numbers for the speaker relay and line input relay
speaker_channel = 4
line_channel = 17
To be accessible from the network, the app should be started as:
switcherapp-run.py -a 0.0.0.0The default port is 8080. You can change it by passing -p portnum on the command line.
Example systemd service file (change mylogin to the real user name):
[Unit]
Description=HW Switch manager HTTP server
After=network.target

[Service]
User=mylogin
ExecStart=/usr/bin/python2 /home/mylogin/hwctl/switcherapp-run.py -a 0.0.0.0
Restart=always

[Install]
WantedBy=multi-user.target
The switch application interface
The server presents four URLs on the network: /spka, /spkb, /linea, /lineb. I’d wager that you can guess what they do. Example command line usage from another machine (upabx uses Python code to do the same):
wget -o /dev/null http://swhost:swport/spkbWhen using the application from upabx, the host and port are set in the upabx global configuration file.
Annex: test definition file details
Tests are defined in simple configuration files. The configuration file name for a test is passed to the GUI on the command line.
This section describes the file contents in detail, but you will usually create the tests with the upabxmktest program, so you should not need to care about the details.
The parameter values are set as:
paramname = some valueAnything which does not look like this will be a comment.
There are two sections in the file: the first one defines the base parameters (A), the second one ([test]) defines only the parameters which change for B.
# A parameters
param = somevalue
otherparam = othervalue

[test]
# B parameters. Only otherparam changes

otherparam = yetanothervalue-for-the-B-sample
Test parameters
The following values can be set. Except if mentionned otherwise, they all can be changed in the [test] section.
- renderer
-
renderer name The UPnP friendly name or UUID for the Media Renderer device to use.
- url
-
The URL used by the Media Server for the track to play. upabxmktest will find this for you. Else, this is not always obvious to determine. upplay has a handy Copy URL entry in the directory listing popup menu. Also, upnp-inspector.
- meta
-
The metadata for the track to play. This will be set by upabxmktest, but not all renderers require it, so you may not have to bother about it if you create a test by hand. Some renderers don’t like URLs though. For example, upmpdcli needs
checkcontentformat = 0if there is no MIME format in the metadata. - seek
-
start of play position in seconds. The player will seek to this position before starting play. This can differ in the second section, which can be handy if you are comparing interpretations and not audio quality.
- dursecs
-
sample duration in seconds. Set to 0 to let the complete track play. Can’t change for the B section (what for ?).
- seqlen
-
number of tests to perform. You won’t be able to save a result before the sequence is complete. The default is defined in the global configuration.
- line
-
line-level switch position. Set to A or B. The value is not related to the A/B choices, A and B are the values used by the hardware switch control application for turning the relay on or off.
- spk
-
speaker-level switch position. Set to A or B. Ditto no relationship to the A/B sections.
If neither line nor spk are set, upabx will not try to access the hardware switch interface.